


Good labeling practices are key for photo organizing and computer file management. When your digital files are foldered and labeled correctly, it’s also easy to maintain that organization by adding new files into the right folders. This post covers a free, easy-to-use tool for cleaning up digital clutter and keeping your family memories just a few clicks away.
Most phones and cameras label your photos with ugly file names that use dates and serial numbers. Images with default file names like 20180210_968972.jpg are still viewable, sharable and can be renamed on a computer in just a few keystrokes. But if you’re tackling thousands of files at once, Bulk Rename Utility is a powerful tool for basic to advanced photo organizing and file management.
Main Functions:
The Bulk Rename Utility Interface
To get the most out of this blog post, you’ll want to download Bulk Rename Utility and follow along. The download is fast and free!
NOTE: Bulk Rename Utility is not made for Macs, which have a basic file renamer built-in. Mac users who aren’t satisfied with the pre-loaded option can check out this list of alternative renaming programs that work with Mac devices.
Bulk Rename Utility offers absolute control over file naming and photo organization. There’s so much that this program can do, and at first glance, all of the different sections and options can be overwhelming. We’ll clear that up now.
This file renamer has several different functions: it can rename files in sequential numbering, rename photos by date taken, add and remove bits of text, copy files to new locations and so much more.
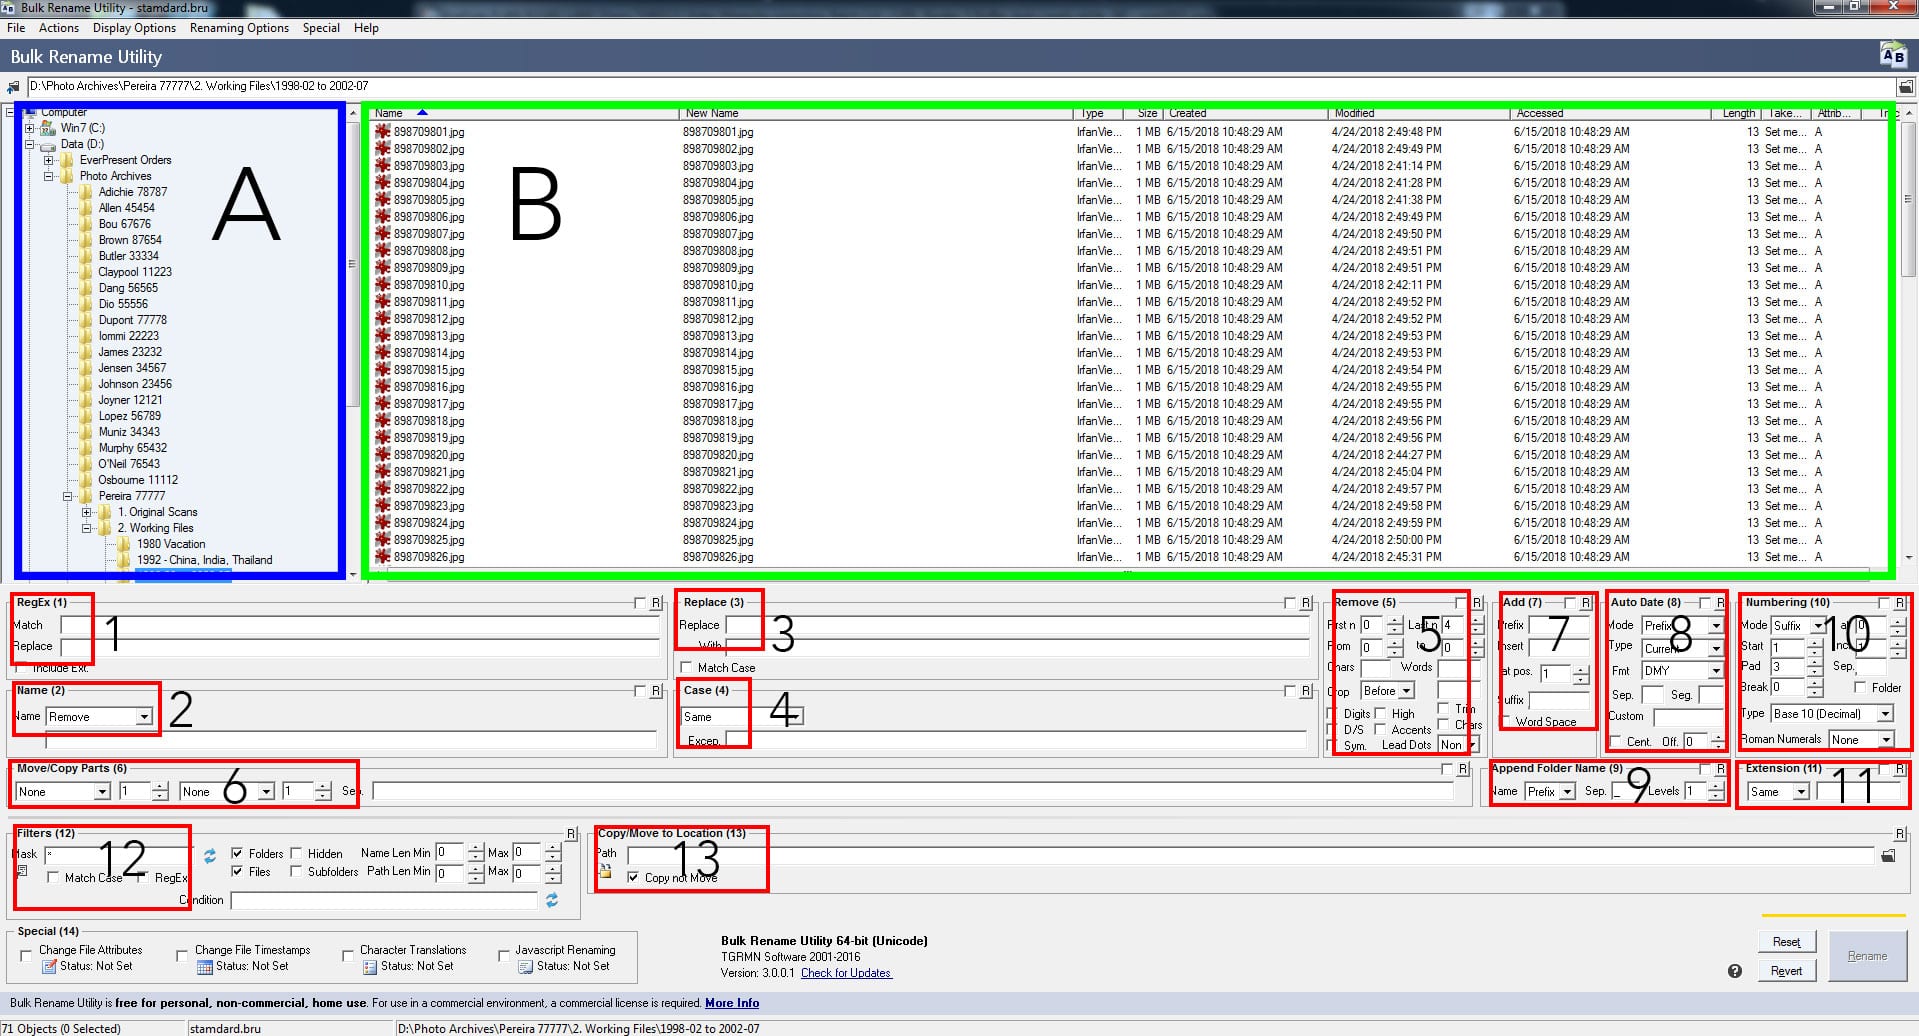
Interface details
Looking closer at the interface, each of Bulk Rename Utility’s functions are broken up into smaller boxes:
- Left Navigation Pane (A): A hierarchical tree-style view of computer drives and folders.
- Right Navigation Pane (B): A detailed list-style view of the files and folders inside of whatever’s selected in the Left Navigation Pane.
- RegEx (1): A find-and-replace tool that uses a complex computer language called Regular Expressions. If you don’t know the language, leave this section alone.
- File (2): Sets rules for the existing file name (Keep, Remove or Reverse it – or specify a new Fixed name).
- Repl. (3): Finds specific text and replaces it with new text.
- Case (4): Sets different uppercase or lowercase options for text.
- Remove (5): Specifies characters and/or words to remove.
- Move/Copy (6): Move or copy specific words or characters to different parts of the file name.
- Add (7): Add specific words or characters to file names.
- Auto Date (8): Add dates to file names (choose between date Created, Modified, Accessed, Taken, or the Current date).
- Append Folder Name (9): Add a folder’s name to the name of a file within that folder – you can even add the names of main folders and subfolders into the same file name.
- Numbering (10): Add numbers to file names.
- Extension (11): Change the file extension (ex: .jpg or .mp3).
- Selections (12): Specify which files and folders are displayed in Bulk Rename Utility.
- New Location (13): Make a copy of the original files, add new file names and place them in a new folder while preserving the original files.
[su_box title=”NOTE” box_color=”#f08e43″]Each section’s border intersects a small white box. Click to place a checkmark in any box for each function that you want to use.
If a section is not checked off, its settings will not be applied and you can ignore it completely.[/su_box]
Batch Renaming Files
As you might have guessed from our breakdown of the interface, you can use Bulk Rename Utility to do a file rename in several ways. You can also use this as a PDF renamer! We use a few of these methods on a daily basis at EverPresent.
While you’re exploring these options, keep one or more files selected in the Right Navigation Pane so you can see what changing each value does to the preview file name under the New Name column.
Make me full screen and let me buffer to the end for the best detail on our settings
Add numbering to multiple files and photos
Adding consecutive numbers to file names can help you keep files in order and tell them apart without needing to open them. Many camera devices instantly add numbers to digital image file names, but you’ll have minimal (if any) control over the default numbering system. Bulk Rename Utility’s Numbering tool puts you in the driver’s seat.
- Use Mode to place numbers at the beginning (Prefix), middle (Insert), or end (Suffix), of your file names. To use Insert, you’ll also need to put a number in the at box to specify the point in the file name where numbering should start.
- Use Start to specify what number you’d like to start with. You’d normally start at ‘1,’ but you can change this number if you’re adding new files to a batch that’s already numbered.
- Use Pad to specify how many digits each file name’s number should be. We normally set this value to ‘3’ at EverPresent, so file number 1 looks like 001. But for batches of more than 999 photos, we’ll set the Pad to ‘4’ so file number 0999 can continue to 1000. This method keeps long lists of files looking clean and consistent.
Make me full screen and let me buffer to the end for the best detail on our settings
Bulk File Rename by Folder Name
For convenient photo organizing and file management, consider grouping your digital files by similarities and sorting them into folders on your computer. Folder names with details like subjects, years or locations can help you find and enjoy your digital memories quickly.
Once you sort your files into folders with names that make sense, you can use Append Folder Name in Bulk Rename Utility to add those folder names to the file names.
- Use Name to place the containing folder name at the beginning (Prefix) or end (Suffix) of the file names.
- Use Sep. to add characters that will separate the folder name from the rest of the file name. Try using a symbol like a hyphen or an underscore!
- Use Levels to indicate how many folder names within in the folder hierarchy should be included in the file name. Imagine you want to rename a file that’s inside of a subfolder, which is inside of a main folder. You could set Levels to ‘1’ if you want the file name to include only the containing subfolder. Alternatively, you could set this number to ‘2’ to include both the subfolder AND the main folder in the new file name.
Make me full screen and let me buffer to the end for the best detail on our settings
How to Rename Photos by Date Taken
Most digital cameras, including the ones in smartphones, store hidden details called metadata inside of digital photo files. Metadata can include information such as camera settings, the date a picture is taken, and even a camera’s geographical location when shooting a photo.
Dates aren’t the only information you’ll need to identify your photos, but they’re still a useful way to add context to your memories. And with Bulk Rename Utility’s Auto Date option, you can add these dates in a format of your choice to the file names of your digital photos.
- Use Mode to put a date at the end (Suffix) or beginning (Prefix) of a file name.
- Use Type to choose from the date of Creation (of the file), the date the file was Modified or Accessed, or the date the photo was Taken. Options ending in (Curr.) will use the current date at the time of renaming. Options ending in (New) will require you to find the menu at the top of the window and select Options > Timestamp to set new values.
- Use Fmt to specify how you want the date to be formatted (Day, Month, Year, etc.)
- Use Sep. to add characters that will separate the date from the rest of the file name.
- Click the checkbox for Cent. to include the century in the year, prompting a year that looks like 2018 instead of just 18.
Make me full screen and let me buffer to the end for the best detail on our settings
Rename Multiple Photos at Once with any setting
After selecting your desired options from above, you’re done with the hardest part of the renaming process.
- Use the two large folder menus on the top half of the Bulk Rename Utility interface and navigate to the files you want to rename.
- You can sort the files in the right-hand menu by name, file type, or the date that the digital photos were modified/taken/etc. The way you’re viewing this list of files will affect the order in which they’re renamed, so pay close attention to how the original files are sorted.
- Select one of the files on the right-hand folder menu and a preview file name appears under the New Name column. If you’re not happy with the preview name and it doesn’t seem to do what you expected, you can manually adjust the settings and watch the preview file name change in real time.
- Once you’re happy with the preview name, you can select the range of files you want to rename. Then simply click Rename and watch the magic happen! This process might take a few moments on slower computers, so make sure to wait for the entire folder to finish processing before you navigate to another folder.

Tips & Tricks from our
batch file rename experts
- If you accidentally clicked Rename, or you’re not happy with the new file names, you can click Revert to the left of the Rename button to undo the changes. Revert will only undo the most recent batch of renaming, so make sure you’re happy with each batch of renamed files before moving on!
- You can use the New Location function to copy files to a new location and rename them without affecting the originals. This option helps you preserve the original file names in case you’re not happy with the new file names later on.
- Once you find settings that work for you and your project, you can save those settings to use them later instead of manually setting them every time you rename files. Find the menu bar at the top of the window and go to File > Save As to save your settings. You can then load those same settings later on by going to File > Open and finding those settings in whatever folder you saved them in.
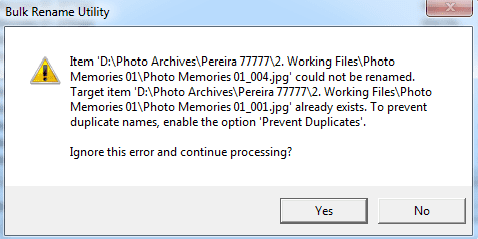
- If you try to rename a batch of files that’s already been renamed, you might get an error message saying that the “Target item ___ already exists.” This message means that you’re trying to use a file name that’s already in use. You can get around this by increasing the Numbering padding by one (ex: change 3 to 4), renaming all of the files at the same time, and then change back to your desired padding to rename once more.
- Some new file names might be too long for Bulk Rename Utility to process. If you get an error message that says “Error Code: The system cannot find the path specified,” try to simplify your Date format or shorten the Folder Name that you’re adding to the file names before renaming.

As a company that works with thousands of digital media files each day, we highly recommend Bulk Rename Utility for photo organization and file management. Some of our technicians like the program so much that they’ve been using it for their personal projects as well.
What we covered in this post is more specific to renaming digital photos, but if you’d like to dig deeper you can check out this comprehensive PDF manual here. Now you don’t have an excuse for those ugly serial numbers in your file names – let’s get them cleaned up and organized with Bulk Rename Utility.
Knowing how to rename a file on Mac or PC is an easy skill to learn, and there are multiple ways to do it without any special software. Stay tuned for a future post on basic file renaming for Mac and PC and the best mac file renamer.